Strawberry nail art designs are perfect for the summer months, so now the sun is starting to break through the clouds, I thought I would embrace this summer strawberry nail art.
What will you need?
You will need a white, red, pink, dark & light green polish, a dotting tool, a makeup sponge and a top coat.
The polishes I used were Essie 'Blanc' (white) Illamasqua 'Throb' (red), Avon Gel Finish polish in Parfait Pink (pink), Barry M 'Key Lime' (light green) and L'Oreal Paris Colour Riche L'Huile in 'Vert Absynthe' (dark green).
Step-By-Step Tutorial:
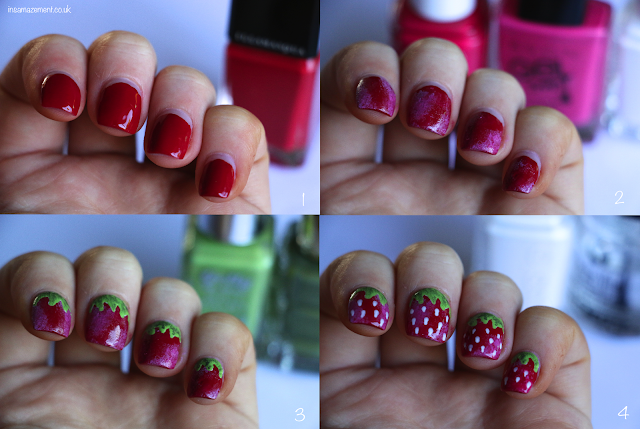
Step 1: Begin by painting all nails in the red polish. You don't need to take this the whole way to the cutie, so just go about 3/4 of the way up the nail.
Step 2: Next, taking the lighter pink shade onto a makeup sponge, press randomly over the nail to create some texture.
Step 3: To begin the strawberry leaves I took the white polish to create the outline, this helps the green appear more vibrant instead of applying over the red polish. I then went over the white with the light green polish. Once dry I took the darker green onto a sponge to create some texture again.
Step 4: Finally take the white polish onto a dotting tool to create the strawberry seeds. Once everything is dry, add a layer of top coat to each nail.
... and there you have your strawberry nail art
Have you ever created a fruity nail art?
Happy nail art-ing!
Sam x


No comments:
Post a Comment