Sunday 6 December 2015

Christmas Mosaic Nail Art Tutorial

If you follow my blog or Instagram, you may know that I love to create a mosaic nail art. So for the festive season I thought I would give is a Christmas twist.

Christmas Mosaic Nail Art Tutorial

What will you need?

You will need a white, red, green glitter and gold glitter polish, a dotting tool and some striping tape.

I used Avon Magic Effects Matte polish in White, Magic Effects Mineral Crush in Pearl & Turquoise and Illamasqua nail varnish in Throb.

Step-By-Step Tutorial:


Step 1: Begin by taking a matte white polish and add to the base of each nail.

Step 2: Take some striping tape and place 3 pieces randomly over the nail.

Step 3: Taking the gold, green and red polishes in turn, add to the spaces between the nail art and finally peel of the striping tape to reveal the mosaic design.

Christmas Glitter Nail Art Tutorial


Have you created any Christmas nail art this year?

Happy Nail Art-ing!

Sam x

Candy Cane & Santa Nail Art Tutorial

You can’t beat a character nail art at Christmas. I combined the classic Santa accent nail with a candy cane stripe to create this nail art design.

Candy Cane & Santa Nail Art Tutorial

What will you need?

All you will need to create this look is a red, green, white, black and nude nail varnish, a dotting tool and some striping tape.

The nail varnish shades I used were Illamasqua Throb & Viridian and Avon Magic Effects Matte polish in White and Black. 

Step-By-Step Tutorial:

Christmas Nail Art Tutorial

Step 1: Begin by painting all nails in a base coat of matte white polish, apart from the ring finger, which you should add a nude base to.

Step 2: Next, once everything is dry, take a dotting tool and create the Santa character on the ring finger.

Step 3: Taking the striping tape, place diagonally across the nail and take the green and red polishes in turn to fill in the gaps.

Step 4: Peel of the striping tape and add a topcoat if you wish.

And there you have your fun Santa and Candy Cane nail art.

Santa Nail Art Tutorial

What’s your favourite Christmas character?

Happy Nail Art-ing!

Sam x

Christmas Stain Glass Window Nail Art


Christmas nail art designs are some of my favourite to create. You cant beat a festive glitter design, so I combined all my favourite Christmas glitter shades to create this sparkly stain glass window nail art.

Christmas Stain Glass Window Nail Art


What will you need?
You will need glitter polishes in purple, gold, green and red, a matte white polish, some striping tape and a dotting tool.
I used all Avon polishes to create this look. The shades I used were Magic Effects Matte polish in White, Magic Effects Mineral Crush polish in Turquoise (green) & Pearl (gold) and Stardust polish in Polished Plum (purple) and Cherry Dazzler (red).
Step-By-Step Tutorial:
Step 1: Begin by painting your nails in a matte white polish.
Step 2: Once the base polish is dry, take some striping tape and place diagonally across the nails.
Step 3: Take the glitter polishes in turn and fill in the diamond shapes between the tape.
Step 4: Finally, peel of the tape to reveal your design.
And there you have your sparkly stain glass window nail art.


Do you have any Christmas nail art planned?
Happy Nail Art-ing!
Sam x
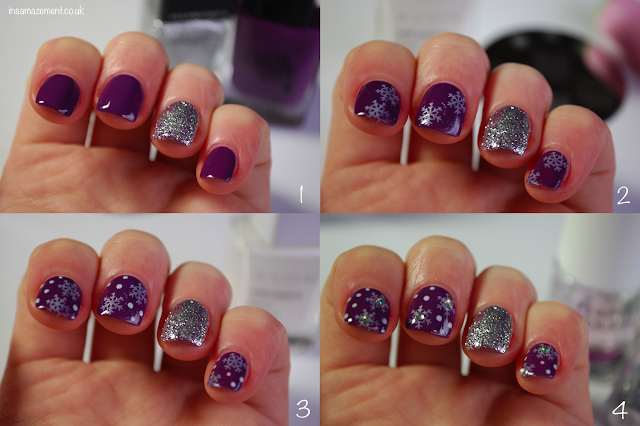
Purple Snowflake Nail Art Tutorial

A white Christmas is always on my Christmas wish list, so I thought I would create a snowy scene on my nails.

Purple Snowflake Nail Art Tutorial

What will you need?

You will need  silver glitter, purple and white nail varnishes, a dotting tool, a snowflake nail stamp and some nail gems.
I used the Avon Gel Finish polish in Purplicious & Magic Effects Matte polish in White and Illamasqua nail varnish in Harsh. The snowflake stamp I used was from Konad.

Step-By-Step Tutorial:

Snowflake Nail Art Tutorial

Step 1: Begin by taking a purple polish and painting this onto the base of each nail. I also added a thick coat of silver polish to my ring finger.

Step 2: Once the base coats are dry, take the stamping tool and add a few snowflakes to each nail.

Step 3: Take the white polish onto a dotting tool and surround the snowflakes in small white polka dots.

Step 4: Once everything is dry, add a topcoat to each nail and press some small nail art gems to the center of each snowflake.

And there you have your snowflake nail art.


Do you wish for a white Christmas too?

Happy Nail Art-ing!

Sam x