Sunday 27 September 2015

Automnal Stripe Nail Art

With Autumn well and truly here, I thought I would push aside my pastels and create a nail art design using deep autumnal tones. To find out how I created this look keep reading...

autumn stripe nail art


What will you need?
All you will need to create this look is nail varnishes in maroon, grey, nude and deep brown. You will also need some striping tape/ stripe vinyls, a dotting tool and some nail art gems.

The shades I used were Leighton Denny 'Purple Reign', Avon 'Naked Truth', Illamasqua 'DWS' and Nails Inc 'Mayfair Place'. I also used nail vinyls from Glammy Mani and the nail studs I used were from Avon nail gem assortment wheel.

Step-By-Step Tutorial:

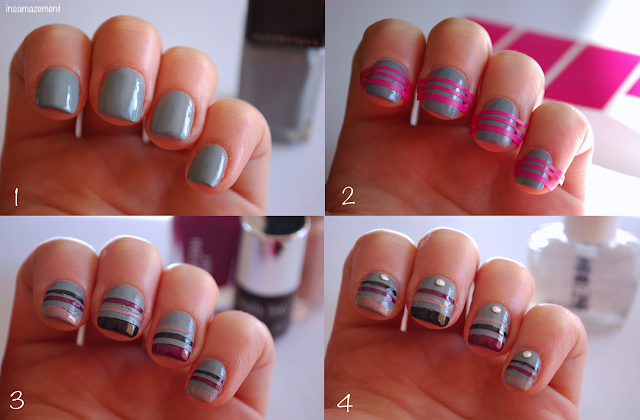
stripe nail art tutorial

Step 1: Begin by painting all nails in a base coat of the grey polish and leave to dry completely.

Step 2: Taking the stripe nail vinyls place these horizontally over each nail. I used a slightly thicker stripe at the tip of the nail and two smaller stripes at the centre.

Step 3: Taking each shade in turn onto a dotting tool, fill in the gaps between the tape.

Step 4: Once everything is dry paint a layer of top coat onto each nail, pressing a small nail art stud towards the top of the nail.

And there you have your autumnal nail art design!

stripe nail art


What are your favourite colours to incorporate into your nail and makeup looks in the autumn?

Happy Nail Art-ing!
Sam x

Sunday 13 September 2015

The Contour & Highlight Edit

Contour and highlighting products

I thought I would blog 'edit' posts, sharing with you some of my favourite makeup products. Today is the turn of contour & highlighting products. Chiselled cheeks and shimmering cheekbones are always on my makeup agenda, so I have tried and tested a variety of products. If you want to take a sneak peek into my makeup stash and find out my current 'go to' contour & highlighting products, keep reading...


Collection Lasting Perfection Concealer in 'Fair 01'
This concealer has been a firm staple in my makeup bag for many years. If you have fairly fair skin and are looking for a flawless looking base and a subtle under eye highlight this is the one for you. I like to apply this after foundation under my eyes, down my nose and a small amount on my forehead and chin, blending out with a buffing brush.

Urban Decay Naked Flushed Palette
This is a recent addition to my makeup bag and I am obsessed with the highlight! The contour/bronze shade is slightly too orange for my skin tone, so I only apply a small amount of this under my cheekbones, however in my eyes the more shimmer on my cheekbones the better. The highlight is a stunning champagne shade which catches the light beautifully.


Nars Laguna Bronzer
As you can tell from the photo above, my Nars Laguna bronzer is very well loved. This bronzer is the perfect shade for me and with just a small amount of shimmer to the feature it allows you to create a natural shadow under the cheekbones. I also like to take this product onto my temples and blend a small amount down the sides of my nose. 

House of GlamDolls 'GlamBase Wheel'
If you are a fan of cream based contour products, this one is for you. I love to use this when I am going for a more dramatic contour, applying the darkest shade and blending out with a buffing brush and the ashy toned contour shade in the wheel is perfect for paler skin tones and day to day contouring. I then tend to go in with a powder bronzer to set everything into place, however the lasting power of this product is like no other cream contour I have tried.


Maybelline Master Sculpt
This is another new addition to my makeup stash and if you are looking for a very subtle contour this is the product for you! The contour powder blends out beautifully and the highlight powder is fab if you are not a fan of a shimmer highlight and again want to create more of a natural, subtle look. A secret addition to this duo is a small makeup brush and mirror hidden below the powders, making this super practical for travellers.

Seventeen Instant Glow Shimmer Brick
If you have your eyes on the Bobbi Brown Shimmer Brick, cast your eyes on the highstreet/drugstore dupe. This has been a fav highlighter of mine for a while and the rose tinted shimmer is, in my opinion, the perfect shade to create a glam glowing finish on the tops of the cheekbones. Another great thing about this product is the shimmer is buildable, meaning you can add as much glow as you wish. 


The Brushes
Finally, I thought I would share with you my top brushes for contour & highlighting. My all time favourite has to be the Illamasqua highlighter brush. The small size of this brush allows you to chisel your cheek bones and it blends powder products out beautifully. The Real Techniques Buffing Brush (which I forgot to add to the photo - whoops!!) is a great brush for cream contour products. Finally the Zoeva 110 Face Shape brush is great for highlighting. The density of the brush allows you to press powder highlighters onto the cheekbones and the small size allows for precision, helping to avoid going too wild and crazy, adding highlighter just where you need it - on the tops of your cheekbones and on the brow bone.

I would love to hear what your favourite products are for contour & highlighting, so let me know in the comments below.

Sam x

FOTD: My Current Favourite Inglot Eyeshadows

When I was at IMATS earlier this year, I picked up this Inglot Freedom Palette and ever since have been loving using 3 of the shades in the palette below to create a bronzed golden eye. The shades I have been loving are number 07, a champagne shimmer; number 157, a golden orange and number 37, a deep bronzed brown.

Inglot Freedom Palette


To create this look I added the deep brown eyeshadow (37) all over the lid and under the lower lash line, topping this with the champagne shade (07) in the inner corner of the lid and the orange shade (157) on the centre & outer corner and also under the eye. I blended everything out using a bronzer to create more of a blown out bronzed look. To finish off the look I added a winged liner and many coats of mascara! 

What I love most about these eyeshadows is that they are super pigmented, meaning you don't need a huge amount on your brush, and they blend seamlessly on the eye. The shimmer finish of the shadows is stunning and the shades are buildable, allowing you to either add a wash of bronze on the eye or create an intense orange shimmer by layering the shadows. 

These shadows are great shades for the summer to autumn transition, as not only do they make a perfect pairing with a nude lip, I also think they would look great paired with a deep berry lipstick (my fav for the autumn!). I also love wearing this look with a pair of intense false lashes on a night out! Head over to my Instagram to find out what my favourite lashes to pair this eye look with are.


I paired the bronzed eye with a strong contour and highlight and if you want to find out what products I used for this, be sure to subscribe to my blog so you don't miss my upcoming contour & highlight edit. 

Have you every tried any Inglot shades? Let me know your favourite eyeshadow looks in the comments below.

Sam x

Rainbow Polka Dot Nail Art Tutorial

Todays bright polka dot nail art look was inspired by the super talented Just1Nail on Instagram. As always I have created a step-by-step pictorial so keep reading if you want to find out how I created this look.

Rainbow Polka Dot Nail Art Tutorial

Polka Dot Nail Art Tutorial

What will you need?
To create this look you will need a black, pink, blue, yellow and lilac polish; a selection of glitter polishes, a dotting tool and some striping tape.
The shades I used were Avon Lavender Sky, Matte Black, Lemon Sugar, Diamond, Agate & Rose Quartz; Illamasqua Cameo and Models Own Sophie's Pink. 

Step-By-Step Tutorial

Polka Dot Nail Art Tutorial

Step 1: Paint the base of your nails in a selection of shades and leave to dry completely.

Step 2: Taking the striping tape, place this diagonally across the nail and fill in the lower half of the nail using the black and glitter polishes.

Step 3: Taking each colour in turn, add polka dots randomly over the ring finger, and matte black section of the middle finger until covered.

Step 4: Add a layer of top coat to each nail to seal the design into place.

And there you have your rainbow polka dot nail art.


They remind me of liquorice allsorts! What do you think of this nail art design? 

If you recreate this look be sure to tag me @insamazement on Twitter and Instagram!

Happy Nail Art-ing! Sam x